
Free Crochet Bracelet Pattern for Kids and Adults
The following article may contain affiliate links. This means that if you make a purchase from these links, I may receive affiliate commission at no additional cost to you.
The recommendations listed here are based on personal experience and the affiliate relationship in no way compromises the integrity of the suggestions. More about sustainable yarns.
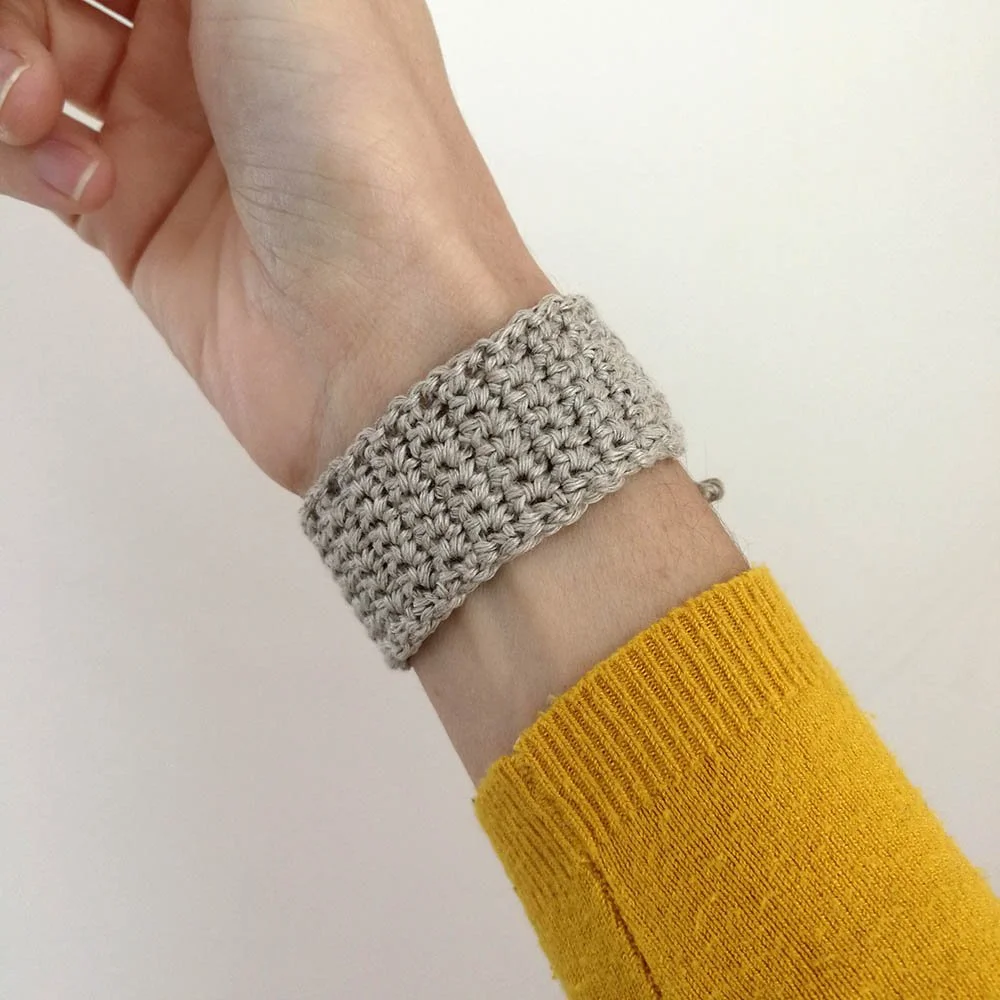
Make your own natural, adjustable, waste free everyday accessory with this free crochet bracelet pattern.
It is suitable for both kids and adults and is a great beginner pattern to get started with if you’re new to crochet. It’s quick and easy and won’t take longer than an hour to complete.

This design came about because I wanted to test out the linen yarn I had just ordered so I made myself a bracelet.
The yarn is super silky and smooth and the result was that, this bracelet, became my new favourite everyday accessory. It’s so soft and comfy and goes with everything I wear.
You can make the bracelet to the measurements of any wrist and if you use a natural based yarn it would be perfect for making bracelets for kids who grow out of things quick. See more of my sustainable crochet patterns.
The crochet bracelet pattern is completely free on this page. However, if you would like to support my work you can buy the AD FREE, downloadable PDF with more photos in my shop.
You can also buy this pattern on
What You Will Need
Which Yarn to Use
This free crochet bracelet pattern was designed using 100% linen in lace weight. I think it is the best material for the pattern for these reasons:
It’s really soft and smooth to work with which makes getting started with crochet easier. Plus the bracelet will be extra comfy.
It will be washable, just pop it into a lightly coloured wash (30 max) with your other clothes to freshen it up.
It’s fully home compostable so once the bracelets have worn out you can just pop them into your compost and make a new one. Easy and waste free.
Measurements
Length: Adjustable but the row count in this pattern makes a 5” / 12.5cm bracelet approx (without the ties)
Width: 1” / 2.5cm approx
Other Crochet Notions
Hook: 2.3mm - Metric / 14 - UK & Canada / B-1 - US / 2/0 - Japan
Scissors: For cutting your ends
Darning Needle: For weaving in your ends
Stitch Markers: To keep track of the spaces created for the ties. (optional)
Abbreviations
[ ] : abbreviated name = The abbreviated name for the specific set of stitches within the brackets which will be repeated at another stage of the pattern.
(10) = Numbers in brackets at the end of rows, show how many stitches you should have at that point.
Ch = Chain
St(s) = Stitch(es)
Ss = Slip Stitch (Video Tutorial)
Dc = Single Crochet (U.K. Double Crochet - Video Tutorial)
Yo = Yarn Over
Pt = Pull Through
Ch sp = Chain Space
Gauge
10 sc x 10 rows = approx 4cm x 3.5cm (1.5” x 1.25”)

The Free Crochet Bracelet Pattern
Ch 6.
Row 1: Ch 1. Sc into the 2nd ch from your hook. Sc into the next 5 ch. (6)
Row 2: Ch 1. Turn. Sc into each sc of the previous row. (6)
Row 3: Ch 1. Turn. Sc into the 1st sc of the previous row. Ch 1. Skip the next st. Sc into the next 2 sts. Ch 1. Skip the next st. Sc into the last st. (6)
Row 3 will have created two small gaps where you will be weaving your ties into when fastening your bracelet to your wrist.
They don’t look very big now but the linen will stretch slightly over time from fastening and unfastening so don’t be tempted to make them bigger. You can use a couple of stitch markers here to keep track of them if you like.
Row 4: Ch 1. Turn. Sc into the 1st st. Sc into the ch sp (the gap that you made in the previous row). Sc into the next 2 sts. Sc into the next ch sp. Sc into the last st. (6)
Row 5-36: Repeat r2 until you have the desired length for your wrist.
Keeping in mind that the design is to have a small gap between the two ends where just the ties are visible.
For the length specified above, repeat 32 times to reach 36 rows in total. Don’t fasten off just yet. (6)
Edging: Working down the side of the bracelet from where you just finished your rows, make one ss for each row. If you struggle to get your hook into the sts, poke your darning needle through it first to open up the st.
When you get to the corner where your slip knot is, be sure to place the slip knot end over the working yarn so that it is wrapped within your next st. Ch 1.
Make one ss in each st along the bottom edge. Ch 1. Work the same up the last side. Ch 1 in the corner. Ss into the next 2 sts.
[Ch 36. Working into the back of the ch only and starting from the second ch from your hook, ss into each ch all the way back down. Ss into the same st from where you started the ch.] : Tie
Ss into the next 3 sts. Make another tie. Ss into the last st.
To fasten off cut the end of your working yarn and weave it through the loop. Pull tight. Weave your ends in so they’re not visible and that’s it!