Crochet Water Balloons Pattern with Sustainable Yarn
The following article may contain affiliate links. This means that if you make a purchase from these links, I may receive affiliate commission at no additional cost to you.
The recommendations listed here are based on personal experience and the affiliate relationship in no way compromises the integrity of the suggestions. More about sustainable yarns.
Learn to make your own crochet water balloons to save waste, save water, save time and save money!
Water fights are so much fun! The cool water on your skin can be such a relief in the heat of the summer and the enjoyment of spending time with your family whilst creating so much laughter makes the game perfect.
Until… you have to start picking up all the tiny pieces of plastic from your garden.
The waste that this bit of fun produces is immense. This project is so quick and easy, it’s really no trouble to get them made up so you can carry on having fun whilst being kind to the environment at the same time.

This water balloon crochet pattern is completely free on this page. However, if you would like extra photos to help or you would simply like to support my work you can buy the AD FREE, downloadable PDF in my shop.
You can also buy this pattern on
How do Crochet Water Balloons Work?
So this is a great idea, I hear you saying, but how do we actually use them?
The purpose of reusable balloons is to replace standard plastic balloons that you would usually fill with water and then throw at each other until it breaks and releases the water.
However, instead of filling these crochet ones, you simply soak them in a bucket or bowl of water. Allow them to soak up as much as they can and then just throw them at your opponent.
Once they hit the other person and land on the floor, they will have released some water but still be wet and usable. You could simply pick it up and throw it again or head back to the water bowl for another quick soak before re-throwing.
It’s that simple!
No mess. No environmental damage. Still loads of fun.
More Benefits to Reusable Water Balloons
Aside from the obvious environmental benefits, making your own crochet water balloons also means you will:
Save loads of time
You won’t need to spend time afterwards trying to find all the tiny pieces in your grass.
You also won’t need to waste time in between water fights filling up new balloons. Just throw them back into the bucket and they’re ready to go again.
Save money
In the long run, since you won’t be buying new water balloons every time, you will save on money by reusing these crochet ones instead.
Save water
You’ll also find that you’ll save water as well because you’ll only be using what the water balloon can soak up, which is less than what it takes to fill a normal balloon, but still enough to soak your opponent.

Which Yarn to Use
You’ll find that most eco friendly water balloons are crocheted with Bernat Blanket yarn because it is thick and fluffy. While this is a great improvement on using single use plastic water balloons because they will be reusable; the yarn is still plastic as it is 100% polyester.
If you’re interested in taking it one step further for the environment then I recommend using Tahki Yarns Hatteras. An organic cotton that is bulky and has a bouclé look which increases its surface area for more absorbency.
Cotton is also the best option for a project like this because it is durable and can withstand frequent washing. Plus it is the best type of fibre for absorbing moisture, so it will be great at getting soaked over and over again.
You will need roughly 25 gram / 27 yards / 25 metres for each balloon.
The ad free, downloadable PDF pattern with helpful photos is available in the shop, Ravelry, Etsy and LoveCrafts.
Pattern Details
Crochet Terms
This crochet water balloons pattern is written in US crochet terms. Please see the abbreviations section below for conversions to UK terms.
Skill Level: Easy
This pattern is easy to follow. After you’ve made one, the rest will be so easy and quick to make up, you’ll have a bucket full of balloons in no time at all.
Approximate Measurements
Height: 12.5cm (5”)
Width: 9cm (3.5”)
Circumference: 30.5cm (11.5”)
What You Will Need
Yarn: roughly 25 grams / 27 yards / 25 metres of Tahki Yarns Hatteras or Valley Yarns Montague for each balloon.
Hook: 6mm - Metric | 4 - UK & Canada | J-10 - US | 10/0 - Japan
Darning Needle: For weaving in the ends
Scissors
Stitch Marker
Abbreviations
ch(s) = Chain(s)
st(s) = Stitch(es)
r = Round
sl st = Slip stitch (video tutorial)
sc = Single crochet (U.K. Double crochet - video tutorial)
flsc = Front loop single crochet
hdc = Half double crochet (U.K. Half treble crochet - video tutorial)
hdc2tog = Half double crochet 2 together
** x 2 = Repeat instructions between the asterisks as many times as it states after the x.
Gauge
3 hdc and 2 rounds = 2.5cm (1”)
Pattern Notes
Chain 1 does not counts as stitch.
Use your stitch marker to mark the first stitch of each round.
Stitch count is shown at the end of each round as <xx>
What the Video Tutorial

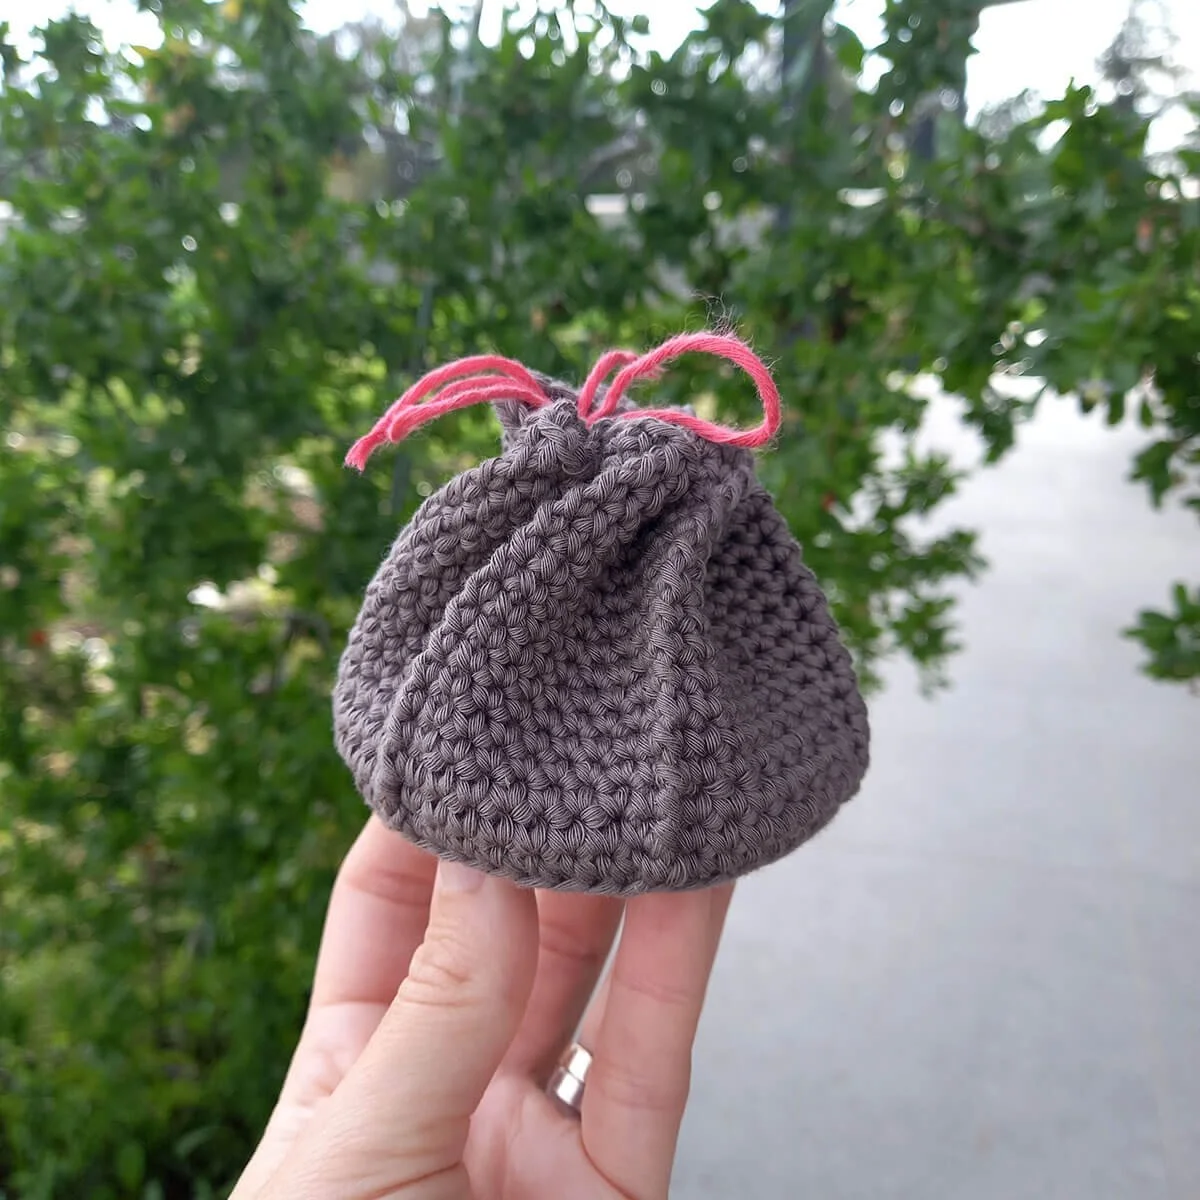
Water Balloons Crochet Pattern
Ch 4. Mark 1st ch. Sl st into 1st ch to join, making a circle. <4ch>
Round 1: Ch 1. 2 hdc into each ch. Sl st into marked hdc. <8hdc>
Round 2: Repeat r1. <16hdc>
Round 3: Ch 1. * 2 hdc into next st. 1 hdc into next * x 8. Sl st into marked hdc. <24hdc>
Round 4: Ch 1. Hdc into each st around. Sl st into marked hdc. <24hdc>
Invert your shape so that the right side is facing out and your starting tail is on the inside. Weave in your starting tail now before beginning round 5.
Round 5: Repeat r4 <24hdc>
Round 6: Ch 1. * 2 hdc into next st. 1 hdc into next 3 sts * x 6. Sl st into marked hdc. <30hdc>
Round 7: Repeat r4. <30hdc>
Round 8: Ch 1. * Hdc2tog. 1 hdc into next 2 sts * x 7. Hdc2tog. Sl st into marked hdc2tog. <22hdc>
Round 9: Ch 1. * 1 hdc into next st. Hdc2tog * x 7. Hdc into last st. Sl st into marked hdc. <15hdc>
Round 10: Ch 1. * 1 hdc into next st. Hdc2tog * x 5. Sl st into marked hdc. <10hdc>
Round 11: Ch 1. Hdc2tog x 5. Sl st into marked hdc2tog. <5hdc>
Round 12: Ch 1. Sc into each st around. Sl st into marked sc. <5sc>
Round 13: Ch 1. Flsc into each st around. Sl st into marked flsc. <5flsc>
Cut the yarn and create an invisible finish. Weave in the end around the base of r13 to create a pinched, knotted appearance in the top like a standard balloon.
That’s it! Now, make as many as you need to fill a bowl and have some fun :)
Let me know in the comments how much your kids enjoyed them and whether they were even bothered that they weren’t plastic balloons.